This is the part where you can put notes in your songs. Music! The Pattern Viewer (PV) looks like this:

You can see three large columns in the middle: each represents a channel of your sound chip. Each column have various strange letters and numbers stacked up vertically. This is your musical sheet!
If you never experienced trackers before, the notation will probably look daunting at first, but don’t worry, it’s actually pretty readable and simple.
5 columns?
You can see 5 columns in the screenshots, of various width.
The one at the left, with the “18” at the top, simply numbers the lines your pattern (i.e. musical score) is composed of.
The three larger following columns are the actual music tracks. They are composed of note cells which are described below.
The next one ![]() is a speed track. This is where speed change (i.e. tempo change) are written. From the blank column, you can guess that the tempo is steady on this part of the song.
is a speed track. This is where speed change (i.e. tempo change) are written. From the blank column, you can guess that the tempo is steady on this part of the song.
Then comes the event track ![]() . This has two uses:
. This has two uses:
- Play samples (like digidrums).
- Declare “numbers” that can be intercepted, on the real hardware, by external code. This is useful to synchronize effects to the music.
More on all these tracks below!
The note cell
Let’s take an example:

The note
B-2 is a note, using a notation mostly used in United States (but not only!), and that matches the SI in Solfege. Here are the matching notes:
| DO | RE | MI | FA | SOL | LA | SI |
| C | D | E | F | G | A | B |
So B-2 is a SI at the octave 2 (going from 0 to 10 , A in hex).
The instrument
The following 0A is the instrument number, going to 1 to FF (hex). The related instrument can be seen in the instrument panel on the left of the screen.
You can also see a RST somewhere in the screenshot at the top. It is actually the instrument 0, and means “reset”, cutting the previous instrument. It is useful to perform a silence. You can write one by either using the instrument 0 or use its related key (explained below).
The effects
The following r0 is one of the many effects that can enrich your music. The list can be shown in the drop-down at the top of the panel. They are all explained thoroughly in this page.
You can stack up 4 effects per line in each track. In the example, only one effect is present. Effects may be related to the note or not, so they can be present without a note being there.
The effects are composed on the effect type (“r” for “reset”), and a value composed of one, two, or three digits. A volume effect (v) has a value of one digit, from 0 to F, whereas a pitch up (u) has a value from 0 to FFF.
The top bar
At the top of the panel can be seen several items:
Record
![]() Click on this to toggle the recording state. When off, you cannot modify the tracks by entering notes. When on, it goes to red, as well as the border of the panel. See below about how to edit the tracks.
Click on this to toggle the recording state. When off, you cannot modify the tracks by entering notes. When on, it goes to red, as well as the border of the panel. See below about how to edit the tracks.
Toggle record via ctrl + space
The follow mode
The next icon is the “follow mode”, and indicates whether the scrolling must follow the played location, or let the user move the cursor as it wishes while the music is played. There are three modes:
![]() This default mode make the sheet scroll when playing, but not if you are recording. This is convenient when composing: you can change notes wherever you want, and you will be able to hear the result when the playing cursor loops back to where you were.
This default mode make the sheet scroll when playing, but not if you are recording. This is convenient when composing: you can change notes wherever you want, and you will be able to hear the result when the playing cursor loops back to where you were.
![]() This is the “classic” mode in all trackers (even AT2): your cursor follows the played location.
This is the “classic” mode in all trackers (even AT2): your cursor follows the played location.
![]() This indicates that your cursor is free to go, even when playing, and regardless of the Record state.
This indicates that your cursor is free to go, even when playing, and regardless of the Record state.
They can be changed via ctrl + F. More on this later.
The steps
![]() Next are the steps. The number indicates how many lines are jumped when a note is entered. Default is 1, but you may want to increase it to, for example, 4 or 8 when you want to add a note at regular interval (such as a bass drum, snare, etc.). You can also change it via numpad / and numpad *
Next are the steps. The number indicates how many lines are jumped when a note is entered. Default is 1, but you may want to increase it to, for example, 4 or 8 when you want to add a note at regular interval (such as a bass drum, snare, etc.). You can also change it via numpad / and numpad *
The other icons
Two other icons are present:
![]() When on, the selected instrument is written alongside every note you enter. This is the default behavior, but you may want to deactivate it for two reasons:
When on, the selected instrument is written alongside every note you enter. This is the default behavior, but you may want to deactivate it for two reasons:
- You have already written a sequence of notes and instruments, and only want to replace some notes here and here without bothering to change the instrument every time.
- You want to write a legato: a note without an instrument. When a note is played without instrument, the instrument doesn’t restart, but continue with the new note.
![]() This shrinks/enlarges the track, by hiding the values of the effects. This is useful when working on a small screen and having many tracks.
This shrinks/enlarges the track, by hiding the values of the effects. This is useful when working on a small screen and having many tracks.
The effect selector
A drop-down and an icon follows:

This is the effect to write if you enter a value in an effect column. You can write it yourself if you want to, but by selecting it in the drop-down, you don’t have to remember its related letter (v for volume, etc.), and it also saves some time and you only need to enter the value, not the effect.
Click on the drop-down to chose any effect to use.
Note that by default, effects type are not overwritten. Check the following icon, which can be toggled.
![]() This is selected by default. When typing an effect value, the possibly already present effect type is not overwritten. For example, if a pitch down (“d”) is present, it won’t be overwritten by your the selected effect type in the drop-down.
This is selected by default. When typing an effect value, the possibly already present effect type is not overwritten. For example, if a pitch down (“d”) is present, it won’t be overwritten by your the selected effect type in the drop-down.
![]() If selected, the selected effect overwrites the effect type that can be present.
If selected, the selected effect overwrites the effect type that can be present.
The information view

The last item indicates what is under the cursor. If over an instrument, it will shown its name. If under an effect, it will show its use.
The track headers
Each column has a header, which may look like this depending on your song:

Position height

Each position has a height, that is, how many lines you can see and hear. Default is 64 (40 in hex, as seen above), with a maximum of 128 (80 in hex). By clicking on the displayed height, a pop-up will show and you will be able to modify it.
As explained in the Linker page, each position has its own height, independently to the pattern it uses. So this allows using the same pattern multiple times, but with a different height.
Toggle on/off

Each track can be muted, or you can also solo one (muting all the others). You can mute/unmute it by left-clicking on the track number, or solo/unsolo it by right-clicking. The same can be done on the EQ on the top-left of the screen.
You can also use the keyboard shortcuts:
- ctrl + numpad 0 to mute/unmute the track where the cursor is.
- ctrl + numpad 1 to solo/unsolo the track where the cursor is.
Transposition
A transposition allows to add/subtract semi-tones to a track, making it sound “higher” or “lower” without having you transpose the notes manually. This is also memory-saving as AT can encode the tracks with the same data.
As explained in the Linker page, each track of each position has its own transposition. So you can re-use the same pattern multiple times and yet have their tracks sound differently thanks to the transposition. Let’s emphasize on this again: even though presented in the pattern viewer, transpositions are related to the current position.
Track names

Each track can be named independently. This can be for fun, or useful if you need to structure them in your mind. A third possibility is linking, as seen just below.
Linking

Click on this icon to “link” or “unlink”. This is an advanced feature to re-use tracks throughout the songs without having to copy/paste them. This was the de facto way of working in STarKos, AT1 and AT2, but could become soon overwhelming, though it could help optimize the size of your song. AT3 does that automatically for you, which works well enough for more cases. You can learn more about this feature here.
Playing and editing
Click anywhere in the music sheet. Notice how your cursor goes there. You can use the cursor keys to move it in all directions, or page updownendstart to move quickly.
Playing note, as in most trackers, is done is done via your computer keyboard. Select first any instrument on the list at the left of the screen, and type on keys such as Q, W, E, R, for the upper octave, or Z, X, C, V for the lower octave (on a QWERTY keyboard). The “upper line” of your computer keyboard represents the higher octave, the “lower line” the lower.
If using the computer keyboard bothers you, you can use any external MIDI controller instead! Just set it up and use it instead!
You can change to the previous/next instrument using alt + up or alt + down.
Note that, for now, you can hear the sound but this does not add any note. Click the Record icon ![]() . It goes to red, as well as the border of the PV. This means that entering notes will not only play them, but also write them.
. It goes to red, as well as the border of the PV. This means that entering notes will not only play them, but also write them.
It is important to know that entering a note can only be done in a Note column. The other columns have a different semantics, and the QWERTY/AZERTY keys will behave differently). Let’s now explain all these columns.
The note column
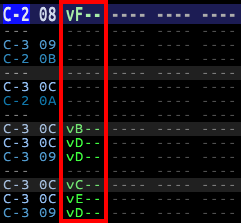
Click on a track, in the Note column (this is the left-most column), as highlighted in the red border in the following image:
Enter a note with the keyboard (computer or MIDI). This will and play it and write it where the cursor is! Note how the instrument number you selected (01 for example) is written on the right of the note. As said above, you can disable the instrument writing with the Instrument icon.
Writing also makes the sheet scroll down of one line, which is handy to enter notes one after the other. How many lines are jumped is set by the steps, as explained above.
The instrument column
The instrument is an hexadecimal number from 01 to FF. 00 is the “stop sound”, also known as RST (Reset), which you can write with shift + R.

You can also find note without instruments. This is called legato, and means that the note is changed but the instrument not restart. You have two ways of creating this:
- either go to the instrument column and press delete to remove the instrument
- or disable the aforementioned Instrument write and write your note, without an instrument.
The effect columns
There are four columns of effects, which is more than enough to create rich and expressive music. Most of the times, only 1 or 2 are used. Each column is made of one letter (the effect type), and 0 to 3 digits, forming the effect value. How many digits depends on the effect. Remember that all these digits are written in hexadecimal, so a 3-digit value would go from 000 to FFF.
For example, go to the left column of the effect, put the Record mode to on, and type “v”. A first default digit (0) will also show. By going back to the effect type, the information column shows:

It means that only one digit is used, and its value going from 0 (no volume) to F (full volume). Go to the first digit and type F. You should hear the note with a full volume! You can change the value to A, 8, 4, etc. and notice how the note volume changes.
All the effects are explained here.
Knowing which key triggers what effect is somewhat bothersome. Which is why the effect drop-down is useful. Also, the effect keys and colors can both be customized in their respective setup!
The effects have an order, which is only limited by logic. For example, two Volume effects is a mistake, as the first would be overridden by the second. When something illogical like this happens, the effect is displayed in red, and an explanation is displayed in the information view.
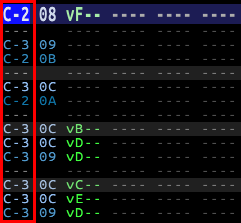
The speed track
At the right of the panel are two smaller columns. The first is is the Speed Track.
![]()
It holds number from 01 to FF, which you can edit like any other column. The purpose of this track is to define the speed of the song, 01 being very fast, FF very slow (06 being default and mid-tempo). The speed changes whenever the playing cursor finds a new speed value. It is thus possible to change the speed at any time.
In fact, the speed is not a “real” speed. It is actually a duration, how many frames the player spends on each line of the tracks.
So a speed of 6 (with a player running at 50 Hz) means that each line will last 0.12s (1 / 50 Hz * 6).
If your song does not change its speed, you can ignore this speed track, yet define the start speed in the parameter of your subsong (Edit > Subsong properties > (select your subsong) > Initial speed).
More explanations about speed and BPM on this page, including shuffle and technicalities!
The event track
The full-right track is the mysterious “event” track.
![]()
In most songs, this will be empty. This track has two purposes, most of the time exclusive:
- Send events to the player
- Play samples! This madness is explained below.
Events
Imagine your music is for a demo, and you’d like to synchronize effects with what is going on in your song. Timing all this is tiresome and could require many trials-and-errors. Events come to the rescue!
By adding simple numbers, from 01 to FF, you can have the player intercept them and react accordingly. You could for example define with the programmer that 01 means “start of the second effect”, or “red flash on the screen”, 02 being “blue flash” etc. It’s all up to you.
To learn on how to intercept events, please check this page.
If you also use samples, it is strongly advised to use the events from the top numbers (FF) and going downwards to avoid clashing with the sample numbering.
Samples
Yes, the event track can also trigger samples. Simply write the instrument number to play, and here you go. But why use this track to play samples instead of the conventional “music” tracks?
- This is mostly useful for digidrums. You don’t have to select a specific note, only the instrument.
- Samples played in event tracks have priorities over the conventional PSG sounds, just like your sample player would probably do. You basically don’t want your samples being replaced by normal sounds. The samples are basically heard “over” the other sounds.
One drawback is that such samples can only be played on one channel, always the same per subsong. You can define it in subsong properties: Edit > Subsong properties > (select your subsong) > Digichannel.
Playing
While not recording, the aforementioned keys on your computer keyboard (QWERTY for a Qwerty keyboard) will make sound, on the channel where the cursor is, and the selected instrument on the list on the left of the screen.
Use numeric pad + and numeric pad - to change the octave, displayed at the top of the screen.
When the pattern viewer is focused, playing with the keyboard will use the cursor location to determine on which channel to play, and its current effects (volume, arpeggios and so on). If any other part of the screen is focused, the Test Area is used. Learn more about this in its related page.
The general keys to play the pattern applies:
- F9 to play the song from the start.
- F10 to play the song from where you are.
- F11 to play the pattern from the start.
- F12 to play the pattern from where you are or from the block start (see below).
- space to play the pattern from the block start (see below) if it exists, or from the start of the pattern if the block does not exist.
- esc to stop.
But some keys are specific to the PV:
- ctrl + W to play the pattern from the start.
- shift + space to set the block start from where you are, and play.
- esc to both stop playing and clear the block if not playing.
Block loop
The block is a new and very handy feature. It is simply a part of the pattern to be played in loop. You can create it via the keys above, or draw it by yourself by drag’n’dropping with the mouse on the line column on the left:
The next time you will press space, the lines from 08 to 0E will loop! To override it, you can either press esc to clear it, or shift + space to set the block start from where you are, and play.
When a block is one line high (less that four will only validate the first one actually), the pattern will play from the block to the end of the pattern, and loop at the block start. If the block is four lines or more, it will loop over its height.
Looping over a section is nice, but what comes handy is using another Follow mode, or the Record mode to on.
Editing
Playing note, or trying to modify them will not do anything unless Record mode is on. So with the PV focused, click on the record button or press ctrl + space. The border turns red. Using your computer keyboard will now write note.
What the keyboard will do depends on where your cursor is. Move your cursor either by left-clicking with the mouse on a digit or empty space, or with the keyboard cursor (left or right to go from a column to another, up or down to go one line above or below.
Some handy shortcuts available on any columns:
- del to clear anything under the cursor.
- insert to insert a line.
- suppr to delete a line.
- enter to hear the notes on the full line and go to the next one.
- And the usual cut/copy/paste/undo/redo.
The note, instrument and effects columns have all been described above.
Selection
By left-clicking and dragging, you can create a selection, which can then be copied (ctrl + C), paste (ctrl + V), cut/cleared (ctrl + X), but also transposed (ctrl + up, ctrl + down).
Note that your cursor is considered a selection, so all the shortcuts here works even when nothing is apparently selected. Moving your cursor also dismisses the selection.

Transposing allows to increase/decrease the note value by semi-tones. Adding shift to the combination increases the transposition rate (an octave).
One nice feature of Arkos Tracker is that is it possible to transpose not only notes, but instruments and effects as well, which is handy to increase effects values because you deemed them too slow for example. This is also handy to change a value without having to type it manually.
Such selection must not include notes, as notes have priorities in the selection. Indeed, if you select a whole track, it would be illogical that the transposition affects the notes, but also all the effects values.