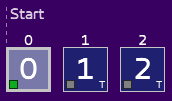
At the top of the screen lies the Linker (LK). It is basically a sequencer of patterns, which contains tracks, which you must have heard about if you have read this tutorial. If the linker of a new song is rather empty and unexciting, here is a more extensive example:

Read this from left to right.
Positions and patterns
Each “box” is assigned a number at the top: 0, 1, 2, 3, up to A (hex) in this example. This is the position number, which is actually only an increasing number. So, to a position is assigned a “box”.
Inside each box is a big number: this is the pattern number. As you can see, patterns can appear several times, which is useful to repeat the same part of the songs without having to duplicate its content manually.
The selection
On position 3, you can see the box being highlighted: this is a selection, which you can define by clicking on a position with the mouse, or with the following keys:
- cursor left cursor right to move backward/forward.
- shift + cursor left shift + cursor right to extend/shrink the selection.
- page down page up to move backward/forward faster.
- start end to move to the beginning/end of the song.
You can also perform the following operations:
- right-click to open a contextual menu.
- space to edit the position (see below).
- ctrl + shift + up/down to increase/decrease the pattern number (within the existing ones).
Creating/duplication/cloning
Various operations can be done on the positions, via the keyboard…
- ctrl + n to create a new position with a new empty pattern.
- insert to duplicate the position (the same pattern is used).
- shift + insert to clone the position (a new but identical pattern is created).
- delete to delete the position.
- enter to open this position in the pattern viewer, focusing on it.
… or via the mouse, by hovering above a position:

The “+” icon will duplicate the position, the arrow at the bottom will clone the position.
You can also drag’n’drop the selection to move it. Press ctrl before drag’n’dropping to copy the selection.
The loop
In the example, from position 4 to 8 is a loop marker:

This indicates that after the position 8 is finished, the song will loop to position 4. Note that position 9 and A are slightly dimmed, because they will never be played, unless you position the cursor explicitly on them. You can use this “out-of-boundaries” section to hide test patterns you may want to use or not later. Don’t worry, unused data are optimized away on export, so don’t hesitate to add seemingly useless positions.
You can edit the loop by clicking on where you want to set the start/end, or with the following shortcuts:
- ctrl + i to set the start where the cursor is.
- ctrl + o to set the end where the cursor is.
- ctrl + p to set the start/end from the selection of the cursor.
Songs always loop. If you want to make a song end on a silence, create an empty pattern at the end and loop on it.
Markers
Position markers
At the very top, you can see “start”, “chorus”, “end”:

These are position markers, which you can use to highlight the structure of your songs for example. Edit the position to add or remove one.
Color markers
At the bottom-left on each box is a small colored rectangle. This is a color marker for the pattern, as opposed to the position markers described above. That is, if you change the color of pattern 4, you will see the change in positions 5, 7 and 9, as all refer the pattern 4. You can also click on it to edit the position (see below).
Transposition markers
In case you transposed some tracks via the pattern viewer, a small T will appear at the bottom-right of the position box:

It is only a marker to show you that even though you may use the pattern several times, the ones marked with a T will sound differently. The transpositions are linked to the position, not the pattern, and can only be defined in the pattern viewer.
The timeline
At the bottom is a horizontal timeline that shows what is being played via a small triangle cursor. Full lines indicates what can be potentially played: past positions but also the next to come. In the following example, only the position 2 is played, because the user played its related pattern only:

Editing the position
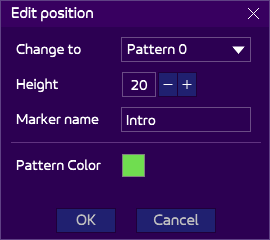
You can edit the position by clicking on the color marker at the bottom-left of the position, or via space on a uniquely selected position. A dialog opens:

All the fields are pretty explanatory.
Notice however how the pattern color is separated from the rest: this is because it concerns the pattern, not the position, contrary to the fields above. When changing the pattern color, several positions may be impacted by this, if they use the same pattern.
