Before reading further, it is strongly advised to have basic knowledge of what the AY/YM can do and how its sounds are produced. I advise you to read this wonderful tutorial, yay.
As its name implies, the Instrument Editor (IE) allows to create and modify the instruments of your song. In the olden days of STarKos, and Arkos Tracker 1 and 2, creating your instruments was done via a complex Excel sheet-like full of numbers, which might have scared many users.
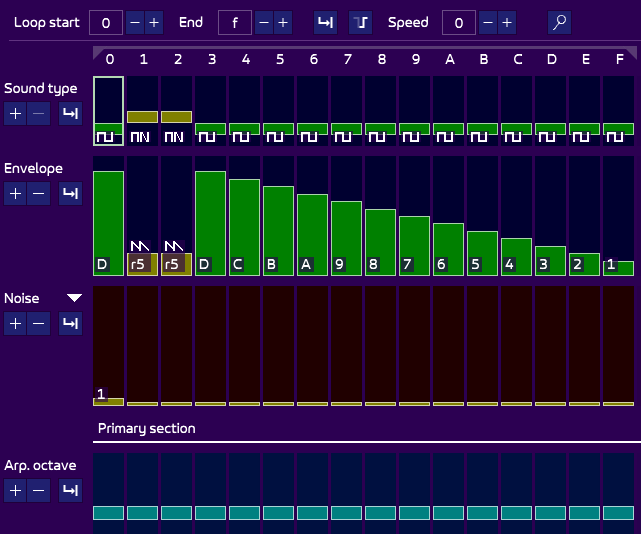
The good news is that the IE has been completely overhauled in AT3, adding more comfort, ease of use, and even more power here and there. Let’s have a look at it:
Everything is meant to be editable via the mouse. However, experienced users will find it faster to use the keyboard and edit everything manually, which is also possible. More on this below.
Columns and loop
The sound is composed of columns, noted from 0 to F here (but possibly up to FF), and read from left to right, each representing a frame. Logically, the more columns, the longer the sound. If your player runs at 50 Hz (as it most of the times is, and is default), meaning 50 frames per seconds, then one column will be played every 50 Hz. As an example, the sound above has 16 columns (0 to F in hex), it will thus last about a third of a second.

At the top, you can see an end slider. This indicates the last column to be played before the sound stops (or loops, as we’re going to see). So it is possible to have many columns, but an end much shorter, which is handy for experimentation.
The loop start slider indicates where to loop when the end is met, provided that you allowed the sound to loop. This is done via the loop icon on the top middle. Clicking on it switches from not looping ![]() to looping
to looping ![]() .
.
A looping sound will play endlessly.
The next icon ![]() deals with a feature called retrig and is specific to hardware sounds. More on this later.
deals with a feature called retrig and is specific to hardware sounds. More on this later.
Then is the speed. I told you earlier that one column is played every frame. Very often, you will find that it is too fast: if you want a slow progressing sound, this would require you to duplicate columns to slow it down. This is both unpractical and memory consuming. The speed counter allows you to slow down the sound: the higher the speed, the slower the sound. A speed of 0 is the fastest: one column per frame. A speed of 1 will play one column for two frames, 2 for 3 frames, 3 for 4, etc.
The second last icon is the shrink icon ![]() . It is purely visual, and allows to hide rows when their data consists only of default values. It is explained in detail below.
. It is purely visual, and allows to hide rows when their data consists only of default values. It is explained in detail below.
The last icon is the zoom icon ![]() and is also purely visual: it toggles the horizontal zoom of the display, which can be handy if your sound has any columns.
and is also purely visual: it toggles the horizontal zoom of the display, which can be handy if your sound has any columns.
Playing
What would be an Instrument Editor if you couldn’t play your sounds, eh? Just like in the Pattern Viewer, or anywhere in the software, simply use your MIDI keyboard, or your computer keyboard (QWERTY or AZERTY, with numeric pad +numeric pad - to change the octave). More on this Test Area page.
Editing the values
Before showing the meaning of all the rows, it is important that you know how to edit the values, test things, and have fun! The in-depth explanations of the values, in the following section, can wait for now!
There are basically two ways to edit the values. With the mouse, or via the keyboard.
Editing via the mouse
This is the simplest way of edition, since you move your mouse on a row and “draw” the desired value.
- mouse wheel up mouse wheel down to increase/decrease the value. Add shift or/and ctrl to increase the value even more.
- ctrl + left-click to draw the value where your mouse is.
- left-click to set the cursor position.
- right-click to open a context menu with more options. Note: these options work from where the cursor is (not the mouse cursor).
- double-left-click to set the value. See below.
Also don’t forget these to navigate:
- mouse wheel to scroll vertically.
- alt + mouse wheel to scroll horizontally.
- alt + up alt + down to change to the previous/next instrument.
Editing via the keyboard
A more precise and maybe faster way is to use the keyboard, which you can see at the top-left of the instrument.
- cursor to move your cursor around.
- page up page down to move the cursor vertically.
- start end to move the cursor to the start/end of the instrument horizontally.
- shift or/and ctrl + cursor up/down to increase/decrease the value.
- enter to edit the value(s) manually.
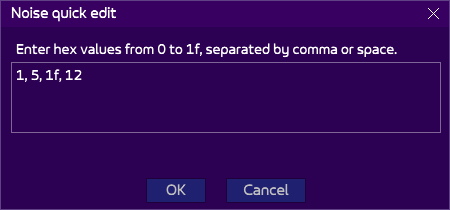
The latter shortcut opens a dialog. By following the instructions, you can edit one, or many values. Example with the noise:
Resulting into this:
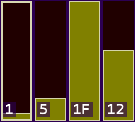
You can use space as a separator (1 5 1f 12), or comma (1,5,1f,12) or both. Any wrong values will be explained via a message.
More complex values, for sound types and envelopes, will have more extensive instructions, but it is basically the same. This way of editing allows you to quickly add values if you have a certain vision of the sound you want. You can also type random values and see what is happening!
Row meanings
Now that’s you’ve seen the columns, how to move between them and edit the values, you must understand what all the rows are about. This is the most interesting part, but also where more explanations are needed.
Cells
Rows are composed of cells. They all follow the same design.
A vertical bar represents a value (the taller, the higher the value), and at the bottom is an image or a text representing the value. A simple example is the noise:
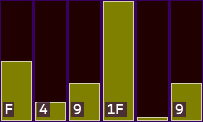
Very often, values of 0 are not displayed to avoid cluttering the interface with useless data.
But some cells may be using an image, such as the sound type:
On the left of every row is the row header:

You can use + or – to visually increase or decrease the height of the row (and thus, the bars). This has an implication: tall bar will take more space, but also may show more values, which actually may not be useful, because by default the bars shown the most useful values, discarding the “useless” ones. More on this later.
There is also a specific loop icon ![]() called auto-spread loop, which is a handy and new feature to automatically copy/paste values without you having to do it manually. This is explained below.
called auto-spread loop, which is a handy and new feature to automatically copy/paste values without you having to do it manually. This is explained below.
A last option, available in most rows, is the ability to hide the row via a small downward pointing arrow. Some rows are indeed not often used, and you may want to hide them for more clarity. More on this below.
Sound type
This row is at the top because it is the most important and will define how some rows below will behave. Once again, please check the tutorial to understand better how the PSG works. You can set the type to 6 different values, from minimum to maximum. From left to right:
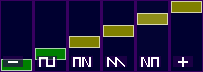
- 0: no software/no hardware. This means that there will be no sound, either “software” (the sound channel is closed: no square wave is generated), or “hardware” (the hardware envelope is deactivated). The only thing you could hear would be the noise generator.
- 1: software only. The sound channel is open: the square wave is generated. This is the classical PSG sound from the 80s.
- 2: software to hardware. This is the typical “hardware” sound everyone knows. The square wave is generated, coupled with the hardware envelope. The hardware wave period is calculated from the software period, which in turn comes directly from the note of the musical sheet. So the software “leads” (more on this in the next row explanation).
- 3: hardware only. No square wave is generated, only the hardware envelope. Such sounds are not often used. They are often softer than the “software to hardware” sound, perfectly constant.
- 4: hardware to software. Like “software to hardware”, except that the hardware period “leads” the calculation of the software. As a result, it sounds as full as “software to hardware”, but it is more stable, because there is no rounding in the calculation between the periods (a multiplication is used). However, the hardware period being more accurate, the software period lose some accuracy and the resulting sound may be out of key as you go into the higher notes. That is why such sound is mostly used for bass. An option, explained later, exists to de-sync the waves to create a “mwwwaaahhh” sound as you desire.
- 5: software and hardware. The final option is also the less used, though it allows special and original effects. It allows the software period and hardware period to be both fed with the input period (the note from the music sheet), but there is no calculation between the two, they are not linked. You can add arpeggios to each if wanted. Icing on the cake, you can force a period on one and not the other. Typically, this allows some Ben Daglish effects where the software wave is used, but the hardware period is forced to a very high frequency (i.e. low period). Just listen to the H.A.T.E. or Skate Crazy solos for example!
Envelope
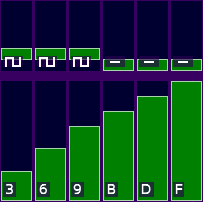
This is the second-most important row, and diverts directly from the sound type. In the two “software” sound types (software only/no software no hardware), the bar represents a volume from 0 (mute) to F (full):
As soon as a hardware envelope is involved, it becomes a bit more complex:
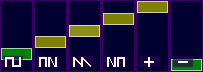
- A hardware envelope icon is shown. It shows the evolution of the volume, generated by the hardware envelope generator, producing from the left to right columns: a sawtooth (F to 0, looping), an inverted sawtooth (0 to F, looping), a triangle (F to 0 to F, looping), and an inverted triangle (0 to F to 0, looping). All the others envelope, less used, are hidden by default (because not very useful besides special effects), but you can see them by maximizing the height of the row to see them.
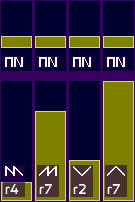
- A ratio (from 0 to 7) may be shown (r0, r1, etc.). It is only present when both waves are coupled (such as “software to hardware” or “hardware to software”). The ratio is used to calculate how the secondary period (hardware for “software to hardware”, software for “hardware to software”) is calculated from the first (the primary). Basically, after the primary period is calculated, it is divided by 2 to the power of “ratio” for “software to hardware”, or multiplied by 2 to the power of “ratio” for “hardware to software”. It may sound complicated, but it is not: just consider that one period leads, and the other is calculated with the help of a ratio, which drastically changes how it sounds. Just experiment and have fun! The higher the ratio, the bigger the operand, so the result may sound either unmusical, or spacey. A ratio from 3 to 5 is mostly used, with 4 being the champion (albeit probably over-used) .
Noise
Noise is mostly used for drums and special effects (explosions etc.). Its value goes from 1 (high-pitched noise) to 31 (low-pitched noise), 0 meaning “no noise”.
Noise can be used regardless of the sound type. It can be used with hardware sounds (sounds mostly bad, though), software sounds and even “no sound”. For the last two, just make sure there a volume of at least one.
Primary/secondary sections
These sections might intrigue you, especially if you’ve used STarkos or AT1/2 before. Their purpose will become clearer when reminding you how the sound types are named:
- No software/no hardware
- Software only
- Software to hardware
- Hardware only
- Hardware to software
- Software and hardware
Most of them have only one or no “side”: no software/no hardware, software only, hardware only. This means that their data is only in the primary section (i.e. the first one).
The others have two sides, with a possible direction: software to hardware, hardware to software, software and hardware. The primary section is the left-side of the sound type name, the secondary section is the right-side. So for example, the primary section of “hardware to software” is for the hardware-side, the secondary section is for the software-side.
Both sections contain the same rows: arpeggio octave, arpeggio note, pitch, and period, described just below.
Arpeggio octave and note
By adding an arpeggio to the base note, you simply add semi-tones to it. In order to visualize this better, AT3 splits the arpeggios into octave and note. You can thus concentrate on the chords in the “Arp. note” section, and brighten it up with the “Arp. octave”. Example:
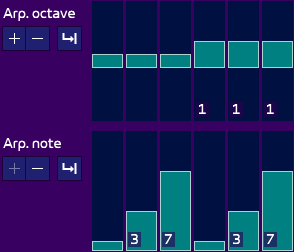
Here you can see the arpeggio notes “0 3 7 0 3 7” (0 being hidden because not important). This is a double-minor chord (0 4 7 would be a major chord). But the second chord is also one octave above.
Adding octave is especially useful along with hardware sounds. Some ratios sound better with higher or lower octaves, so don’t hesitate to play with different combinations.
You may also wonder why you should use arpeggios in the instrument whereas you can also add them via arpeggio effect in the pattern viewer. This is an excellent question! And the answer is two-fold:
- As said just above, you might want to tweak the octave for specific hardware columns, which would be tedious to do in the pattern.
- Arpeggios in the instrument and in the pattern are added. Which is awesome because you can create very organic sounds by mixing the two. Advice: use a change of octave in the instrument, and use a “melodic” arpeggio (0 3 7, etc.) in the pattern. Since the instruments and the arpeggio will probably have different lengths, the sounds will be richer and progress a lot more than if it was only an arpeggio in the instrument or in the pattern.
Pitch
The pitch is a simple addition to the period of the sound. You can create vibratos with this (though you should rather use the pitch effect in the pattern). Pitch is also very useful in drums (a pitch-down emulates a bass-drum or a tom for example).
A special effect can be done in the secondary section, if you are using a “software to hardware” or “hardware to software” sound: you can add a desync by yourself using the pitch. This is especially useful in the “hardware to software” sound, where both envelopes are originally perfectly synchronized, thus created a very long “mwaaaaaahhh” sound, or any special effect you can come up with.
Period
This is probably the less-used row of all, yet you can come up with interesting effects. It basically forces the period, thus ignoring the one from the musical sheet. A value of 0 means “automatic”, the default case in which AT will calculate the period from the musical sheet, and the aforementioned arpeggio and pitch.
However, setting the period can be used for these purposes:
- For a drum, you could hand-write the periods you want. One advantage is that you can then transpose any track using your instrument, it will always sound the same.
- You can force the period for a drum and have the rest of the sound use the automatic period: the beginning of the sound (for example) will always sound the same, the rest will follow the notes from the pattern. Mad Max on Atari ST used this technique a lot to create bass preceded by an attack of a drum.
- If using the “software and hardware” sound, force the period of the secondary period to a low value (from 2 to 10) and enjoy a “Ben Daglish” sound!
Note that imposing the period renders the arpeggio and pitch rows of the section useless: they will be greyed out. Indeed, if you force the period, nothing can be calculated from it.
Also, be mindful that forcing the period will sound right only on your target hardware: you will have to adapt it for it to sound the same on a hardware with a PSG of a different frequency.
Auto-spread loops
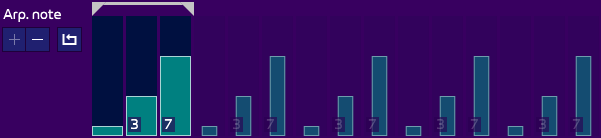
This is a new feature in AT3. Remember how you sometimes want to spread a few values of a row (noise, volume, arpeggio, etc.) up to the end of sound? There was a “spread” option in AT2, but every time you made a change, you had to “spread” again. AT3 does this automatically. Imagine you have a 0-3-7 arpeggio you want to see during the whole sound. Simply enter it once, click on the “auto spread icon” ![]() on the left of the header of the row. A loop handle appears at the top:
on the left of the header of the row. A loop handle appears at the top:
You can set the auto-spread loop by clicking on the start/end of the loop handle, or use the cursor and the following keys:
- ctrl + shift + p to toggle the loop.
- ctrl + shift + i ctrl + shift + o to set the start/end where the cursor is.
In this example, the loop is set to the first three columns, and the arpeggio is copied/pasted till the end of the sound automagically! Modifying the looped sequence automatically changes the spread values. This is non-destructive: you can click again on the loop icon ![]() to disable it, and the previous values will reappear. The generated values, slightly greyed-out and shown with thinner bars, cannot be modified.
to disable it, and the previous values will reappear. The generated values, slightly greyed-out and shown with thinner bars, cannot be modified.
Note that this auto-spread loop is only a way to quickly and automatically copy/paste values. It does not create an inner loop that would be different from the loop of the instrument.
Also, you cannot spread up to a specific column. The values are spread up to the end of the sound.
Retrig
Retrig is an slightly advanced concept and only concerns hardware sounds. Basically, when you ask for a specific hardware envelope (8, sawtooth for example), then ask for it again later, AT will ask the PSG to continue where it was and will not trigger the envelope from the start. This may be a bit bothersome if you want to force an attack when a new note is sequenced in a pattern: if the same note is played, it won’t make the difference with the previous one. Since you don’t control the volume of the envelope, there’s not much you can do, unless resorting to coupling a noise, or adding a software envelope somewhere to mark the difference.
Fortunately, AT got you covered. The retrig option allow to force the restart of the envelope. There are two ways of using it.
Retrig in the header
On the top of the instrument is this icon: ![]() . What it represents a non-retrig state: the hardware envelope continues where it was, this is the default state. Click on it and it will change to
. What it represents a non-retrig state: the hardware envelope continues where it was, this is the default state. Click on it and it will change to ![]() , meaning that the hardware envelope of the first column will be forced for retrig. So it is useless to toggle it unless you have a hardware sound in the first column!
, meaning that the hardware envelope of the first column will be forced for retrig. So it is useless to toggle it unless you have a hardware sound in the first column!
This icon is only a handy shortcut to other technique explained just below.
Retrig in the row
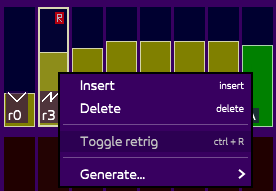
If you set the cursor on an envelope, right-click and select “Toggle retrig”, or use ctrl+r, a small red “R” will appear, meaning that this envelope will be forced-triggered.
Note that using a retrig in a loop sounds awful most of the times. Consider it a mistake, but maybe you can use this as a special effect (note: Buzz-sync SID, invented by TAO on Atari ST, is actually an effect that relies on this trick, but just like all SID effects, it requires very accurate timing, which current AT players, and AT itself, don’t handle).
Showing more values
In order to save space and hide useless data to the user, AT only shows the most commonly used values in the rows. For example, the arpeggio octave, by default, shows only from -4 to 4, because it is very rare that one uses more than that. However, you may want to do so. An example:

The area cannot access a value higher than 4. How to get access to all the values? Very simple: use the “+” on the left to increase the area height. You can they add any value you want.

Note that when you get back to a smaller area by pressing the “-” on the left, out-of-bounds values will be shown in red with an arrow on top to highlight the fact that what you see is not the actual values (nothing to be feared actually if you changed something you didn’t want to: undo works everywhere!).

More about that just below!
Hiding and shrinking rows
As you can see, a sound is composed of many rows, but as you will learn, most of the sounds will only use a few of them. No need to display all of them in full! That’s where the hide and shrink options come into play.
Hiding
Hiding is done by clicking on the small downwards arrow in every row, such as here:
By clicking on it, it shows/hides the data of the row. A nice thing is that when hiding a row for a specific instrument, leaving to another instrument and going back will restore its state.
Only the envelope row cannot be hidden, but every sound requires it.
When using the cursor, you can:
- hide the row above the cursor with shift + f
- hide the row below the cursor with control + f
Shrinking/expanding
As explained above, if you use only the first values of a row (for example, pitch +1/-1), it would be a waste of space to show a range going from -FFF to +FFF. In that case, you can change the height of a row:
- expand the row where the cursor is shift + g
- shrink the row where the cursor is control + g
Automatic hiding/shrinking
The good news is that all that is explained above can be done automatically, and is automatic on one time: when opening an instrument for the first time, only the rows with significant data are visible. What’s more, the rows are shrunk as much as possible to show only the needed values.
However, with time, you may have changed the height of the rows, shown rows which you don’t need anymore, etc. Simply use the shrink icon ![]() (or use shift + h) to hide all the useless rows and shrink the useful ones!
(or use shift + h) to hide all the useless rows and shrink the useful ones!
Some rows can be shrunk even more (the same amount of values, but within a small height), which is handy but reduces a bit the visibility. This is thus not the default option. To shrink even more, right-click on the shrink icon (or use control + h).