This is the fourth part of our tutorial.
So far we’ve got two positions with two patterns. We’re now going to create a new melody and add the first effects.
I want to clone the first position and put it at the end in order to modify it. Let me show two ways of doing it:
Manually
- We could create a new empty one: right-click on the last position and select “New”, or press ctrl-n create the new pattern.
- Then you would have to copy/paste the content of the position 0 by using, in the PV ctrl-a to select the whole pattern, then copy/paste it in the new empty pattern.
Cloning and moving
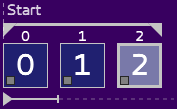
Or you could right-click on the position 0 in the Linker and select “Clone” (or use shift-insert). In position 1, a pattern 2 has been created. Drag’n’drop it to the end of the song.
In the end, your song should look like that:
A melody instrument
We’re going to create a new instrument called Melody. You can use any template you want, but make it sounds a bit like that:
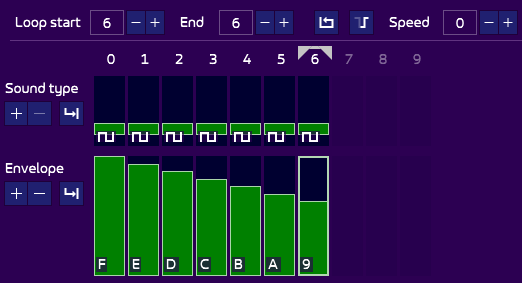
(The sound type section is shown, but it may be hidden on your screen). On this screenshot, you can see that there is a loop on the last bar: click on the numbered-“6” volume bar to move your cursor here, and press:
You could also use the sliders at the top to set the values manually:

If you play the sound, it should have a nice attack sound that loops endlessly:
Writing the melody
Go back to the PV, and make sure that you are on the position 2, thus editing the pattern 2. Clear the notes of the first channel (the melody), as we’re going to add a new one.
Select the Melody instrument (slot 5), and write these notes:
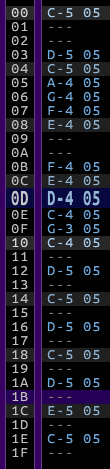
It should sound like this:
Great! But we’ll improve it by adding effects.
Volume effects
Now enters the four empty columns you can see in every track. In AT, you can use these columns to add effects, four maximum at the same time (which is more than enough). Effects are exactly what you think they are. If you play the guitar, you know what a vibrato is, or how you can make a slide from one note to another. Or if you sing, you know how soft or loud you can get. Such effects increase expressiveness. This is the same with AT effects.
All the effects are described here, but in this tutorial I’m going to take it step by step – you can delve on the effect page later.
The first thing we’re going to add is volume effects. This add dynamics to the sound. Volume can go from 0 (mute) to F (full volume), and the effect is represented by the letter “v” (each effect has its own assigned letter, which you can customize if wanted).
Go to the melody track, to the first effect column (which is empty), first line:

Notice that the Information View (IV) at the top-right hints at what is under the cursor, so that you don’t get lost:

Put Record on, and type a “v”. Go up to get back to the effect you just typed. The IV shows:

This helps if you don’t know how an effect works: this volume effect needs only one digit (hence x--), which you can see in the track – a default value of 0 is written along with the effect:

As we will see later, some effects use 2 or 3 digits. One thing you might have noticed is that your melody is not heard anymore. This is because the track now has a volume of 0, hence muted!
Replace the 0 with a F. Now the volume is full.
Note: the volume effect is not an amplifier, but actually an attenuator. F means that the instrument volume is used at its full. E means that the instrument volume is decreased of 1. D of 2, C of 3 and so on.
We’re going to make the melody more dynamic by adding volume at every note. We could go on and write “v” on every line, then the value, but this would be boring. At the top of the PV, you can see a drop-down:

By clicking on it, you can see all the effects available in AT. For now, keep “volume” selected. This means that whenever you enter an effect value (such as the F written earlier), the drop-down effect will automatically be written. There are two advantages:
- You save some time because you don’t have to type it.
- You don’t have to remember the bloody effect letter!
Note: be aware that by default, as a security, the drop-down effect will not overwrite an effect letter that would be present. To overwrite it in any case, toggle the icon at the right of the drop-down, which switches from
to
.
Now enter the following effect values:
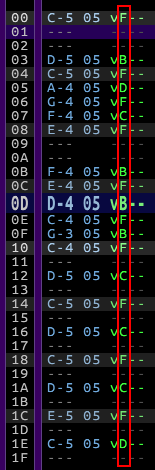
The melody sounds much more dynamic:
Pitch effect
Let me show another example with a pitch effect (which changes the frequency of the note). I’ll remove the last note, and add a pitch down effect (“d”):
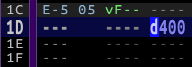
Two things to notice:
- I wrote the effect on the second column, but I could have put it on any other column. Do as you like! Personally, I like to put volume effects on the first column, and pitch effect on the second, for clarity.
- This effect requires 3 digits, contrary to the volume effect that required only one.
It sounds like this:
The “400” value may be obscure, but for now, simply accept that the bigger the value, the faster the pitch. Also note that even though I only wrote d400 once, the pitch effect continues on the following lines. Pitch effects are trailing effects: they continue:
- as long as no other note is found.
- no other effect (of the same category (pitch, volume etc.)) is found.
You could also write d000 to stop the effect (meaning, a pitch down that doesn’t pitch).
Note that the volume effect does not reset automatically. If you use a volume at 5, all the following notes will play at such low volume. Two possibilities to reset it:
- Write a
vFon the next note. - Use the reset effect (“r”) on the next note. The reset effect, as its name implies, stops the effects, puts the volume at its maximum, etc.
Conclusion
That’s it for this tutorial! I hope you enjoyed it and have a better understanding of AT3. Feel free to continue fiddling with this song, or smash the package songs to bits to understand the many musicians’ tricks. Many things are possible on AY, and many have still to be discovered!