Let’s have some fun and create a first song! But first of all, I strongly encourage you to read the two previous tutorials, the one about the PSG and the one about the concept of sequencing.
Note that this tutorial relies on the default keyboard mapping, so if you’ve tweaked it, please don’t blame me if the shortcuts shown here are not the same as yours. If at any point you wonder how to do any keyboard action, don’t hesitate to go to File > Setup > Keyboard mapping. This is also a good way of learning of actions not explained in this manual yet handy to you.
There may be some keys that are not working well depending on your OS and your keyboard layout. Remapping them will correct the problem!
The beginning
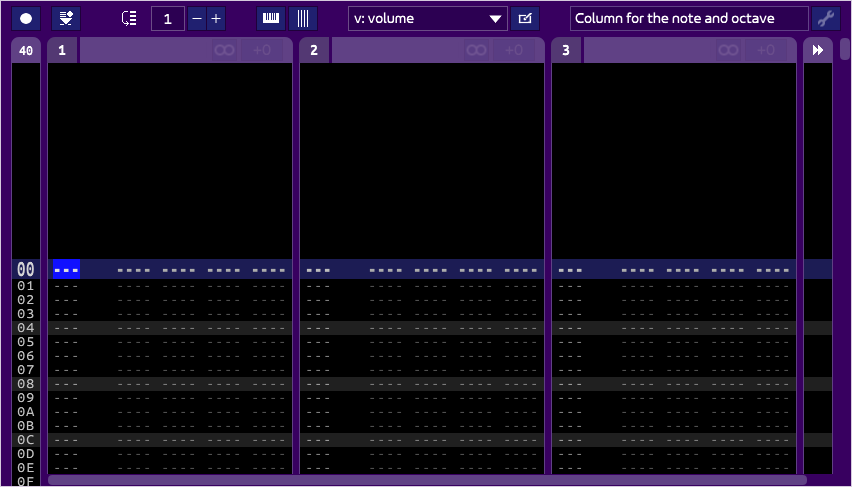
Arkos Tracker (AT) starts with an empty song. This is a good start. The software also kindly create one empty pattern, as you can see in the Linker (LK) at the top-right:

Also, in the instrument list (IL) on the left is one basic instrument called “Beep”, which we will use it to create our first melody. We’ll create our own a bit later.
Let’s hear something!
Before laying our notes down, we want to make sure our beep sound can actually be heard. Maybe your sound card is faulty? Or my software buggy? There are three way for playing notes: you can use computer keyboard: AZERTY owners will pressed a to y, QWERTY owners: q to y. How fun! A small beep should be heard (if not, consult the File > Setup > Audio/MIDI interfaces). Notice how the more “right” you go on your keyboard, the higher the note is .
You can also use lower notes by pressing w to n for AZERTY owners, z to n for QWERTY owners. These are the sames notes, one octave below.
Want more notes? You can select the base octave either by changing the “octave” at the top of the screen, or by pressing numpad + to increase it, numpad - to decrease it. After changing the octave, play some notes to hear the change.
You can also click on the piano at the bottom to emit some notes:

Or if you have a MIDI keyboard, plug it and use it! You will probably have to set it up in the File > Setup > Audio/MIDI interfaces page, which is also detailed here.
Writing our first melody
Everything is ready to write our first (great) melody. Above the piano area and taking most of the space is the pattern viewer (PV). This is the main element you will be working with.
If not done already, give focus to it, either by clicking inside it, or by pressing F2 (remember this key!). Notice how pressing the QWERTY / AZERTY keys produce sounds. However, nothing is written yet.
What you see is called a pattern. It is simply a group of tracks. Three to be precise, because the default song targets an Amstrad CPC, which PSG can handle 3 channels. So far, all three tracks are empty. You should see your cursor in blue. Use the updownpage up page down keys to change the line where your cursor is. By using homeend, you can move to the first and last line of your pattern. The last line should be marked “3F”, or 63 in decimal.
By using rightleft, the cursor moves horizontally, from one column to the another. Even simpler, left-click on a location for the cursor to go to it!
You can clearly see your 3 tracks. Each is composed of many columns. What the hell is that? Don’t worry, it’s simple. Plus, a little help at the top-right of the pattern indicates what is under the cursor, so you’ll never get lost:

Move your cursor at the top-left of your first track. It looks like the picture of the PV above.
We will write our first note. For this to be possible, the Record mode must be on. Either click on the Record button at the top of the PV ![]() , or press ctrl + space (or on Mac ctrl + r). Look at the Record button: it is bright red, so is the border of the PV.
, or press ctrl + space (or on Mac ctrl + r). Look at the Record button: it is bright red, so is the border of the PV.
Makes sure the octave is 3 (you’ve learned how to check and change it before).
Press a (AZERTY) or q (QWERTY). Yay! Our first note! You should see C-4 01. What does it mean? Simple: “C” is the note, using the US notation (“C” for “do”, “C#” for “do#”, etc. In order: C, C#, D, D#, E, F, F#, G, G#, A, A#, B).
“4” means the octave 4 is used. “01” means instrument 1, which is “Beep”.
The other columns are reserved for effects, which we will use only later, so let’s forget about them for now.
The pattern viewer is explained thoroughly in its specific page. You can keep it in a corner of your browser as a reference.
You have written one note of our masterpiece. Let’s hear it again. But how? There are several ways.
You can use the icons at the top of the screen, such as ![]() to play the song from the start,
to play the song from the start, ![]() to play the current pattern from the top, and
to play the current pattern from the top, and ![]() to stop playing.
to stop playing.
Keyboard shortcuts exist, and I suggest you to use them. Here are only a few:
- space to start/stop playing the current pattern from the top (it also does more, which will be explained later).
- enter to play the note under the cursor and go to the next line. Very handy to play a few notes only!
- F9 to play the whole song from start.
- F11 to play the current pattern from the top.
- escape to stop playing.
One note does not make a song. Let’s add more! Go to the top of the pattern, first track, and write the little song described below. Only three different notes are required (the first three notes of your top keyboard! And if you make mistakes, use del to erase, or ctrl + z to undo).
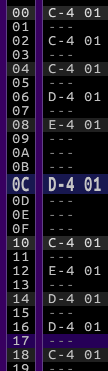
This a rendition of the famous “Au clair de la lune / By the light of the moon”. No need to do something more complex for now. Don’t worry, we will spice it up quite soon.
Note: you may wonder why I chose to have one empty line between each note, where I could have saved some room by packing them all and (probably) decrease speed. One answer is that it allows to add more notes in between. So by having more space, you also get more resolution to put more notes. But the answer is mostly personal. Some musician like to have more space between notes “just in case”, or because they like having a quick-scrolling pattern. Anyway, just be assured that there is no wrong answer and, given that you can change the speed at any time (we’ll see how), you can have one pattern with packed data, and another with many “holes”.
Pattern height
By now, if you entered the notes correctly, you should hear this:
This is great (yes it is!), but the pattern is too long: it would be nice if the melody could be played without the big blank that comes after it. There are different way on handling this, depending on your music. You can add new notes if you consider your melody should continue. Or you can shrink the pattern. This is what we are going to do.
At the top left of the PV is a number “40”. It is actually the length of the position.

Yes, I said position, and not pattern. That is because, the pattern itself has no height. The height is defined in the position. This is nice: you can use the same pattern several times with a possibly different height each time.
Click on the “40”: this opens a dialog for you to define a new height. Set it to 20 (hex), thus half the current height. Play the pattern again: it has now the “right” height, musically speaking.
Let’s continue on the next page!